Welcome to Fantabulous Cricut Challenge Blog! Cricut enthusiasts come share your projects with us. Twice monthly we offer simple challenges for your chance to win! No matter which size Cricut machine you have, come join the fun.

Thursday, December 6, 2012

Cricut Craft Room: Hiding Contours

Good morning everyone!

It's Missy here with another Cricut Craft Room tutorial for you.  Last week we learned how to manipulate our images when we place them on our mat.  This week, we're going to talk about the "Hide Contour" feature.

If you're new to Craft Room, you may not even know what on earth "hide contour" means.  This is a really handy feature when you're trying to make an image more of "your own" design.  Hiding contours simply means telling your Cricut NOT to cut certain parts of an image. 

Why would you want to do this??  Lots of different reasons!!! Let's say you want to cut that super cute little reindeer from Create a Critter 2, but you have a face stamp you'd rather have on him instead of the face that you would create if you cut all the layers.  Well, your main image layer is going to look like this. 
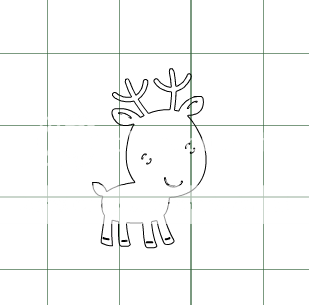

See those black lines along where his eyes and mouth will be??  If you're going to use your own face stamp, you don't want those lines to cut out, because it wouldn't look right.  Another example is this tree from Simply Charmed.  Let's say you wanted to cut the tree out, but instead of cutting the leaves that comes with the image, you want to add some little hearts to it, for like Valentines Day or something. 
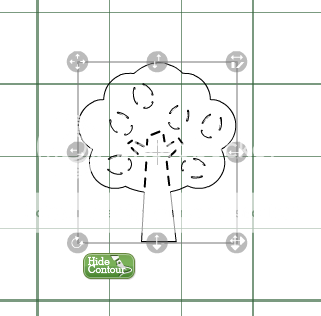


You wouldn't want those cut lines for the leaves showing up, so you'd want to hide them.  Another example might be if you were going to make a box or a bag from a cartridge, and you didn't want the score lines to cut, because you were going to score it a certain way yourself---you could hide those so they wouldn't show.  Those are just a few examples.  Now let's get to how you do it!!

When you've chosen an image that you want to "hide" something on, place the image on your mat and select it.  I'm going to work with that adorable little reindeer here.
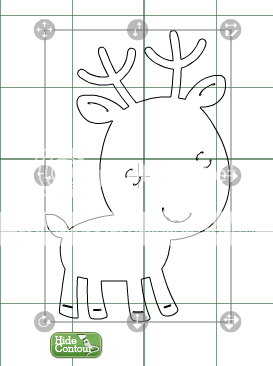

See in the lower left hand corner, that green box that says "Hide Contour"?  Click on that.  Now, as you hover over your image, you will notice that some of the lines "light up" red.  As you move your arrow around, hover over the lines you don't want to cut.  When the line turns red, click it, and it should turn to grey.
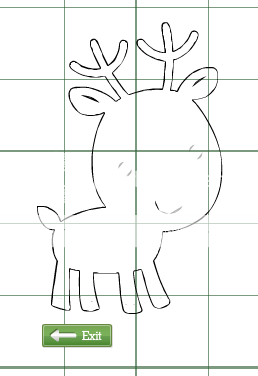

The greyed out lines are the ones that will not be cut.  The ones that are in black will be cut.  In the picture above, I've hidden the reindeer's eyes and mouth, so I could use that cute little face stamp on him if I wanted.

Oooopsies......what if I click on something to hide it, but I really want it to be cut, like I did here??  I accidentally selected the whole reindeer's body, but I really want his body shape to be cut.....
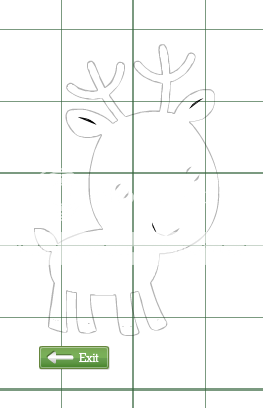
Easy peasy!!  Just click on any greyed out line and it will again appear black and will be cut.  And, to get out of the hide contour "window", click the little green exit button and it returns you to your regular mat function.

So there you have it.  Some reasons why you might want to hide contour, as well as an easy way to do it.  I'll be back next week with another fun tutorial for you!!!



post signature

Wednesday, December 5, 2012

Wednesday Winners Challenge #139 Holidays Wishes

Its Wednesday so that must mean it's time for 
WEDNESDAY WINNERS !!
YIPPEE !!
We have been creating for the fast approaching holidays season with
CHALLENGE #139
Holidays Wishes

A big thank you to everyone for high lighting the cartridges used in your projects it's made choosing our top five so much easier  !! x !! 
xoxox

This week our wonderful sponsor is ...


They have generously donated a $25 gift card for our lucky winner


So with the help of RANDOM.ORG  lets find out who that is....

THE WINNER IS ...

No 5
Creating with Winter Frolic
Kim

Congratulations Kim, I am so pleased your little mouse has won, to claim your prize please contact Janea at... recollection alley @ gmail . com (remove all spaces) 
You have two weeks to claim your prize.
Remember to grab your "FCCB Winner" blinky to display on your blog, you can find the blinky code in the right hand side bar

DESIGN TEAM TOP 5

We had 39 amazing projects to choose from this week... wow !! I guess Christmas must be popular then ?? x ?? 
HO HO HO ... he's coming very soon !!
Thank you to every one who joined us 

No 3
Creating with Teresa Collins December 25th

No 13
Creating with Christmas Cartridge

No  15
Creating with Winter Wonderland

No 30
Creating with Create a Critter 2
Alice B 

No 36
Creating with Winter Frolic

Congratulations Ladies don't forget to grab your "FCCB Top 5" blinky to display on your blog! 
You can find the blinky code on our right-hand sidebar.  
  
We hope you are joining us for this week's challenge #140  Snow or Snowflakes
As ever, please use a new project with at least one Cricut cut and tell us which cartridge(s) you have used.

Wishing everyone a Fantabulous Day !!
post signature

Tuesday, December 4, 2012

Masking Technique

Hi everyone and welcome to another Quick Tip Tuesday! 
This week's tip is a quick one - how to stamp a scene with the masking technique. This video is from simonsaysstamp, you can find more videos from them HERE

Thank you for stopping by and don't forget to check the Wednesday Winner's tomorrow! 

post signature

Monday, December 3, 2012

Challenge #140 - Snow


Good Morning! 
Happy December....I know everyone says it, but where 
did this year go?  I haven't a clue!
Here in northeastern Oklahoma I wore capri pants and flip flops yesterday.  Doesn't quite seem like 22 days until Christmas.  
Of course, it could snow tomorrow....it has done it before!
  Our challenge this week is to provide inspiration for those snowy days ahead.  So once again, get those cricuts chirping and post your
snow or snowflake projects.
 
Let it Snow, Let it Snow, Let it snow! 


Challenge #140 -Snow

Design Team Inspiration
 
Jamie
Winter Frolic
  

Winter Frolic


Create A Critter 2


 Enjoy The Seasons


Winter Woodland, Christmas
Snow Folks

Wrap It Up cartridge

Winter Frolic

Gypsy Wanderings
Christmas


 ~ This Week's Sponsor ~


This week, Fantabulous Cricut is delighted to be sponsored by Recollection Alley. I have donated  three brand new Cuttlebug embossing folders to be given to one lucky participant to be drawn at random from all eligible entries. 


To link your project for this week's "FCCB's Snow" challenge,
click on the blue "add your link" button below! This challenge ends at Midnight December 9th (Mountain Time).
As a courtesy to our design team, please consider turning off the word verification on your blog. With the new system, it has become quite difficult to leave comments for our FANTABULOUS followers.
When linking your project, please remember to list on your blog what Cricut cartridge you used.


Sunday, December 2, 2012

Sunday Spotlight!


Happy first Sunday of December all!  

It is Arin here and I would like to encourage you to take a moment away from trimming the tree and meet Melissa from No Bees, Please!  She lives in New York, just a stones throw from the Big Apple with her husband and her two small little boys!  The apple of crating talent does not fall far from the tree, her mother is an avid blogging crafter who has been mentoring and supporting her in her new passion.  She has been blogging for almost two years and is really making a splash with her talent.   That splash of talent just landed her a spot on a recent Top 5 with this card! 


Check out this amazing layout found while perusing her blog.  What a great way to capture the in's and out's of precious little boys! 


Here is another amazing project that is a wonderful idea for a wedding gift!


Now let's get to know this talented crafter! 
1. When did you start scrapbooking/paper crafting and why? I only started paper crafting in 2011, at the persistence of my mom.  She is an avid card maker and paper crafter and she gives me all of her hand-me-down supplies.  
2. What is your favorite type of project to make (i.e., cards, layouts, mini-albums, etc....)? My favorite type of project is a toss up between home decor and crafts/treats for my son's class.  I am the Party Leader for his Kindergarten class, so I get to plan all of the crafts activities.
3. What is your favorite product to use on your projects? I would have to say my favorite product is PAPER!  You can do so many different things with paper.  It's easy to alter it's shape.
4. What is your favorite Cricut cartridge? My favorite Cricut cartridge?  That's a tough one.  Because it works so well with children's projects, I think I have to pick Create a Critter.
5. What do you do in your spare time, when you are not paper crafting? Spare time?  What's that?  LOL!  I am paper crafting in my spare time.   I am usually busy with a 5 year-old boy, who is in half-day Kindergarten and a 2-1/2 year old boy.  They keep me very busy.  When I do find some free time, I like to jump on Pinterest for some home decor project ideas.   

Getting to know Melissa from No Bees,Please! has been sweetly inspirational!  Be sure to head over to her blog and check out more of her creations.  Before signing off for the week, here are a few more fun projects! 


Till Next Week,
Arin


post signature

Saturday, December 1, 2012

Scrappin' Saturday - Holiday Wishes


Happy Scrappin’ Saturday!! Wow!!  Today we start the last month of the year...and with only now...shall I say it?!?! Yes I shall....we only have 24 days left until Christmas!!  Have you already gotten all your Holiday Cards completed and envelopes addressed, just ready to go out in the mail?  Or are you like me, and can't figure out where the time has gone let alone know where to figure out when you will find time to make them in the next couple weeks?!?  If you haven't gotten them done....this week's challenge is perfect for you.....


#139 – Holiday Wishes - Make a Holiday Card. If you want to join in on the challenge this week, there is still time to link up a project!! I wanted to share a couple projects that have been submtted for this week's challenge!!
 
Karon
over at Karon's Krafty Korner made these adorable cards for the challenge!  I love the paper you has used along with the polka-dot embossing folders for the background behind the adorble trees!!
 
 
 Sonya
over at Sonya's Paper Trail made this adorable snowman card!  The paper choices are wonderful, the snowman is so cute with his stamped face and the sentiment is perfect along with the 'Let it Snow' all down the side of the card looks great!!
 
 
We want to see your
Holiday Cards, where you have used a cut from a Cricut Cartridge....please leave a comment with your blog address so we can stop by to see them! Hope you are able to find some time to do some Scrappin’ this Saturday as well as having a great Thanksgiving!! Thanks for stopping by!

Melissa
 

post signature