Welcome to Fantabulous Cricut Challenge Blog! Cricut enthusiasts come share your projects with us. Twice monthly we offer simple challenges for your chance to win! No matter which size Cricut machine you have, come join the fun.

Friday, February 28, 2014

FCCB #199: All About You

Good morning everyone!

We hope you're enjoying our "All About You" challenge this week.  I decided that since we are supposed to share a project with our favorite colors this week, I'd search around the web and find some projects using some of my favorite colors to further inspire you!

My very favorite color in the world is pink.  I found these ultra cute birthday party items made by Arin at A Piece of Life's Pie.  She used the Rock Princess cartridge to whip up some birthday treats for a friend's daughter.


My second favorite color, that I actually love every bit as much as pink, is turquoise.  I found this pretty trinket box created by Nancy Damiano.  She used the Wrap it Up cartridge for the box.


I love all colors equally after those two.  Yellows, red, green, and anything in between.  I found this super card made by Robin at Robin's Creative Cottage.  She used the Life's A Beach cartridge on this one.


I thought I'd share a couple of my favorite cartridges as well!

Create a Critter


Create a Critter 2


Birthday Bash


We'd love to have you join us in our challenge this week!  Happy crafting!!
post signature

Thursday, February 27, 2014

Thursday Tutorial--Layering Heat Transfer Vinyl

Hi, everyone and welcome to another Thursday Tutorial!  Last week I showed you how to used iron on vinyl with your Cricut.  Today I'm going to show you how to layer iron-on vinyl on your fabric project.


Thanks for watching--I hope this helped!  Have you ever used your Cricut to cut iron-on vinyl for a fabric project?  Tell us about it in the comments.  Thanks for dropping by today!
post signature

Wednesday, February 26, 2014

Wednesday Winners Challenge #198 Sketch Challenge

Good Morning Everyone !!
Welcome to this weeks 
WEDNESDAY WINNERS

Challenge #198 Sketch Challenge
Thank you for joining us for our first sketch challenge, I really enjoyed working with the structure of a sketch, hope you all did too !!
This will be my last Wednesday Winners post for a while the lovely Emily will be here for the months of March and April while I get to take a little break, hope to see you all at the beginning of  May!!
Happy Crafting x 

THIS WEEKS WINNER

Chosen by random.org 
with a prize from

Of a Be Wild and Free Stamp Set

...IS...

NO 6
Created with Stand and Salute
Cindy

Congratulations Cindy  !!
To claim your prize please contact fantabulous cricut 101 @ yahoo. com  (remove all spaces) 
You have two weeks to claim your prize.
Remember to grab your "FCCB Winner" blinky to display on your blog, you can find the blinky code in the right hand side bar.

DESIGN TEAM TOP 5

No 1
Created with Art Philosophy
Katrina


No 7
Created with Art Booking
Michele


No 8
Created with Paper Dolls Dress Up
Maria Lina Creative Designs


No 10
Created with Birthday Bash
Julie


No 12
Created with Lifes a Party and Elegant Edges 
Linda

Congratulations ladies don't forget to grab your "FCCB Top 5" blinky to display on your blog! 
You can find the blinky code on our right-hand sidebar.  
  
We hope you are joining us for this week's challenge #199 All about You 
(Use your favourite colour)
As ever, please use a new project with at least one Cricut cut and tell us which cartridge(s) you have used.

Wishing everyone a Fantabulous Day !!

post signature

Tuesday, February 25, 2014

Quick Tip Tuesday

Happy Tuesday!!! Emily here with another Quick Tip for you!!!
I have had my Expression for almost 2 years now and I have had the same 2 mats the entire time!  
I simply can't justify buying a new mat when I can re-stick them over and over and over again!
You have probably already seen the ways to re-stick your mat, but thought I would go over them anyway.

Option 1.  Clean your mat with soap and water.  I just use Dawn Dish Soap and warm water to do this.  Pat them somewhat dry with a towel then let them air dry all the way.  Then take a Zig 2 Way pen - the big fat one - and run the glue over your mat.  The pen is almost an inch wide, so you can just go down each column/row with it and pretty much coat the mat entirely.  
Then let it dry - Easy Peasy!!!

Option 2.  This comes from my friend Laurie over at Hiding In My Craft Room.  I copied this info directly from her blog.  I haven't tried this myself yet, but am going to soon enough :)


Laurie says, "The solution I use it 1 to 1. So equal parts of Aleene's Tack it Over and Over and water. Yes, it has to be that glue! I find it at JoAnn's or Michaels but not every one I go to has it in stock or carries it. If you ask someone that works there about it they will look at you like your crazy! Lol! 
I've also seen it sold online.
When my mats start loosing their sticky about half the time all I need to do is give my mats a could scrubbing with foamy kitchen soap, rinse, let them air dry, and they are back to usable! This gets the debris and bits of paper off and reveals the wonderful sticky again! Other times I just add the sticky solution following the video below. I do get asked about 'cleaning' the mats. You know, getting all the gunk completely off and making itcompletely unsticky. A little of the residue or discoloration doesn't bother me. They might look old but they work better than NEW! Buuuut, if it bothers you then you can use any glue remover to throughly clean it then apply sticky solution. Let me warn you, it is messy and don't get it on the carpet. Learned that the hard way. I just used goo gone and the scraper in the Cricut Essentials tool kit but I wish I hadn't, it's still a little sticky. I wish I had used instead a pampered chef scraper. I have so many of those, I wouldn't mind just throwing it away afterward."  
The link to her YouTube video is HERE.

Hopefully you find one of these ways useful in re-sticking your mats and getting the most life possible from them before buying new ones!!!

Until next Tuesday...
post signature

Monday, February 24, 2014

FCCB Challenge #199 All About You

Welcome to another Challenge Me Monday...


 Happy Monday and welcome to another Monday challenge!


Challenge #199: All About You
Use your favorite colors

This Weeks Sponsor


Carri~abusybee from DoubleClick Store
3 Bags of Skittles

~Design Team Inspiration~

Guest Designer/Sponsor
Hello Kitty
Edge to Edge & Designer's Calendar

Doodletype


Paisley

My Community

 Kim
Cricut Sampler


Clare

Edge to Edge, Fancy Frames, Imagine Audrey, Imagine Heirloom


Sunday Spotlight Designer Shawn Mosch
Create a Critter 2


Karla
Art Philosophy, Stretch Your Imagination, Gypsy Wanderings

Wild Card 2


CTMH Artbooking


Doodlecharms, Elegant Edges


Ro
George & Basic Shapes

~This Weeks Challenge~
All About You
Create a project that uses your favorite colors!

To qualify for the prize, be sure to use at least 1 Cricut cut on your project and if it's not obvious, let us know what cartridge you used.


post signature

Sunday, February 23, 2014

Spotlight Sunday

post signature

Hello Crafters. Faith Wallace here with our Sunday Spotlight entry.

By the end of the weekend, we crafters may need a little more inspiration. That is why FCCB has the Sunday Spotlight column where we showcase work from Guest Designers. This week we are so thrilled to have Shawn Mosh from Crafty Chics Blog join us. Her blog is full of great inspiration, so definitely check it out. Shawn is also the owner of MyCutSearch. Her Cricut search engine is fantastic when you want to find just the right cut. 

Shawn told us a little about her crafting history:

In the fall of 2004 I was invited to a crop event at my daughter’s daycare.  Several of the daycare teachers were avid scrapbookers.  I had never scrapbooked before . . . I had always placed photos into photo albums and sometimes I would slide a few pieces of memorabilia into the photo albums.  I told myself that the ONLY reason I was going to this crop was because it was a fundraiser for the daycare and the teachers told me about some Disney themed products that would be sold there . . . we had just taken a trip to Walt Disney World that year, so I figured that I would do “just this one scrapbook” of our 2004 trip to Walt Disney World.

Now, 10 years later, I have a crafting blog, a website devoted to helping people find images on Cricut cartridges and we have converted my son’s old bedroom into my craft room.

I love the rhinestone sticker sheets from The Buckle Boutique.  These sheets are amazing!  The gems are actually a soft resin that you can cut with scissors, a craft knife or a die cutting machine.  Yes . . . you can cut them with your Cricut!  I have used them to add sparkle to so many projects.  Just cut the shape I want with the Cricut, peel off the backing and stick.  You get the look of rhinestones without having to line up and glue down each individual gem.

I also love my papers.  I cannot get enough of them!  My husband even built me a paper tower for my craft room so that I can separate them by colors and patterns and keep them all organized.  No matter how much paper I have,
 I can always fine more that I have to add to my collection.


Shawn's favorite Cricut cartridge: 

That’s an easy one . . . ANY of the Disney Cricut cartridges!

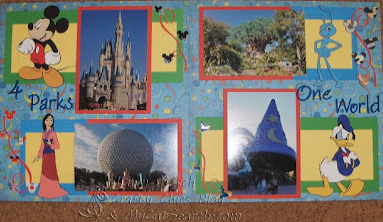
Here are some great examples from Shawn's blog:

Disney: Day One
Mickey and Friends, Best of Pixar, and Happily Ever After


Mickey and Friends