
Hello everyone. It's time for the Thursday Tutorial and I have a great one for you today. I have had the pleasure of becoming friends with Amy from Love to Crop through one of my other DT's and Memories in Time Blog Hop Group. Amy is so talented and creative and she is also very talented on the computer. She taught me a lot and she is the one that recently made my darling Cricut Friends Blog Hop button.
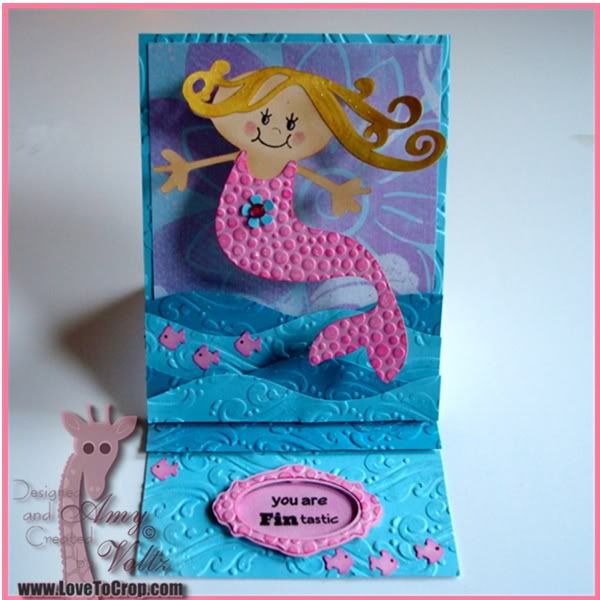
So a few weeks ago Amy posted the directions on how to make home made wiggle wires to make your cards wiggle and jiggle. I was always wanting to make my cards move like this but had never ordered the fancy little dulahs. So I tried out her tutorial right away and made my own cute Wiggle card for the Emily Blog Hop I was in. It was so easy and worked perfectly. I am so excited that I have this new option for my card making. Kids and adults alike will love it.


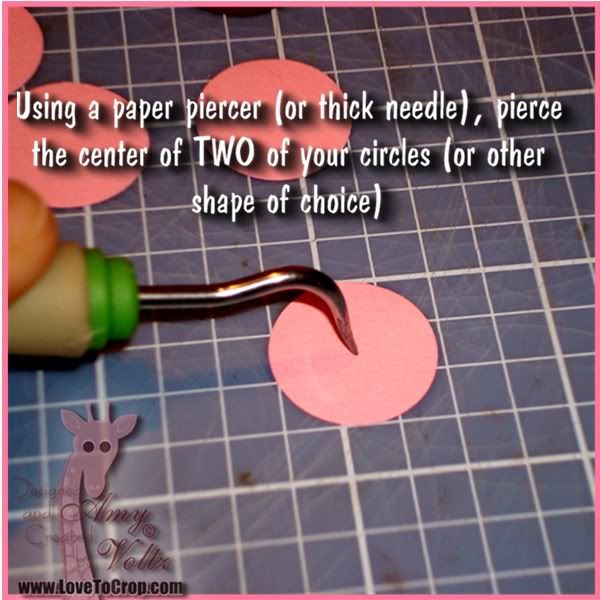
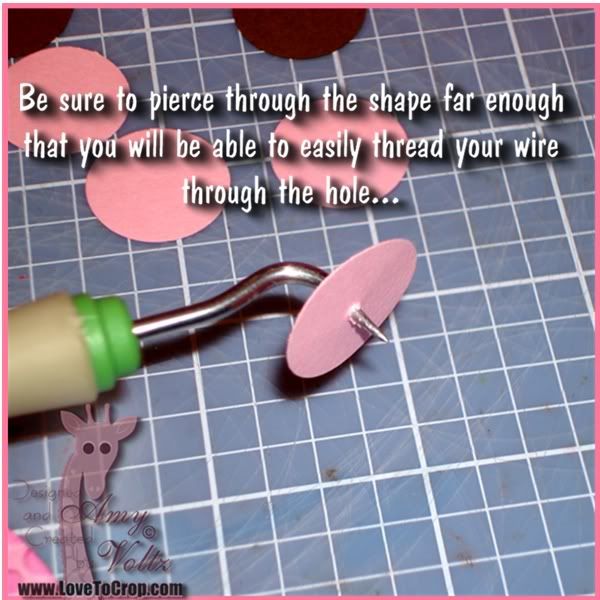
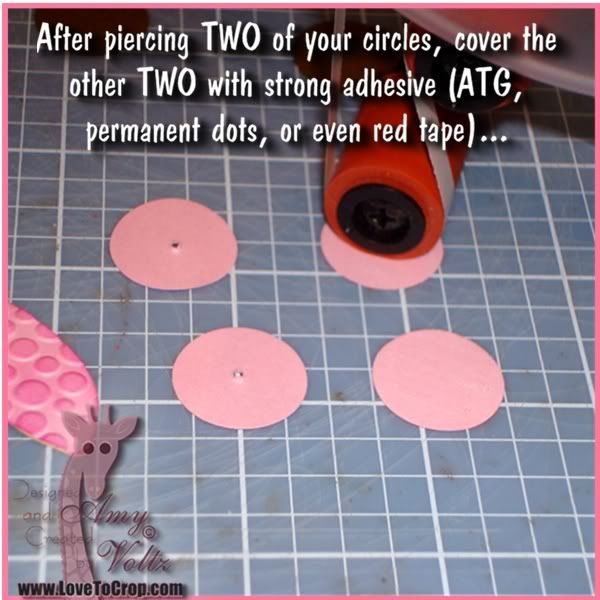
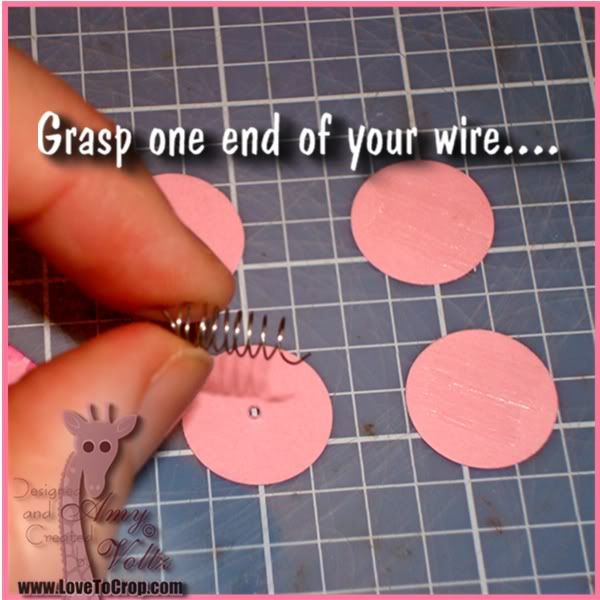
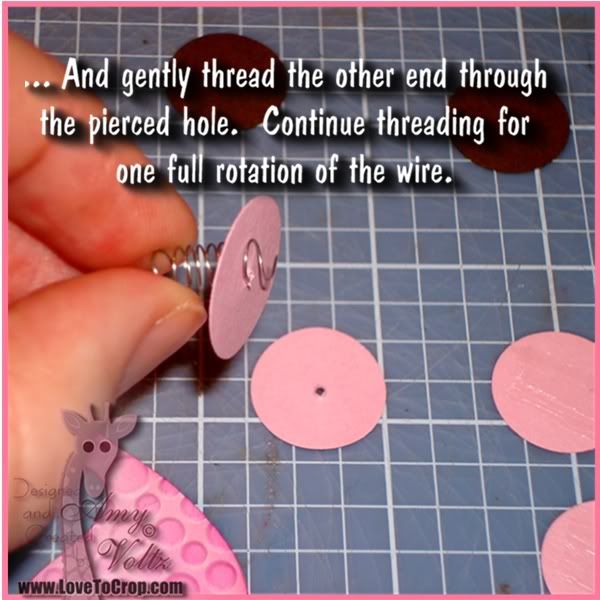
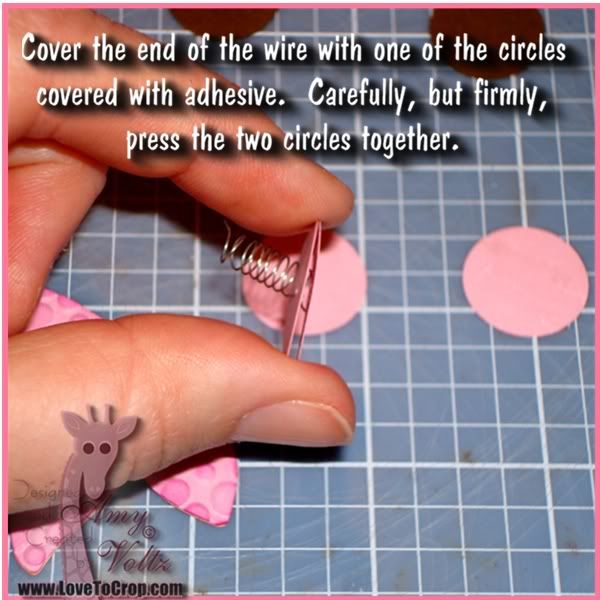
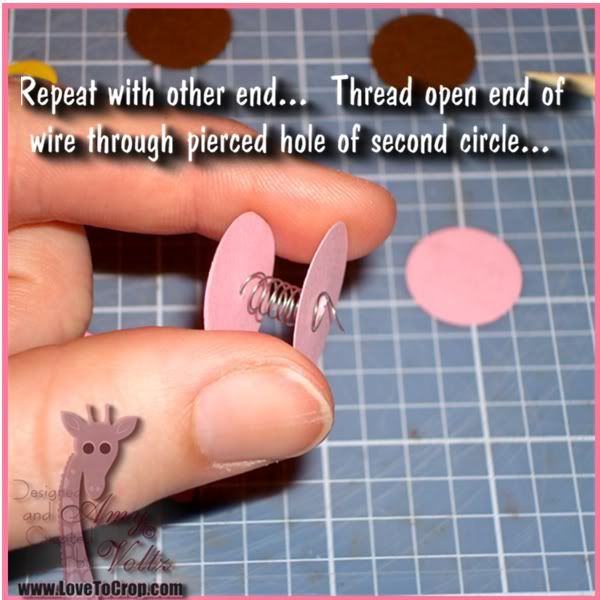
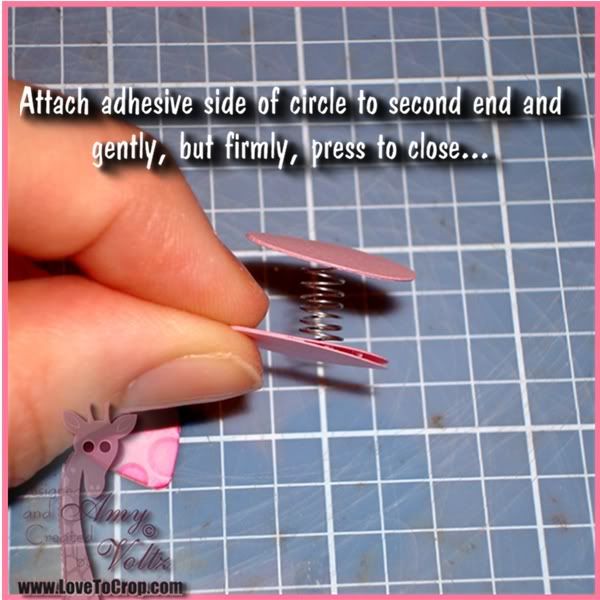
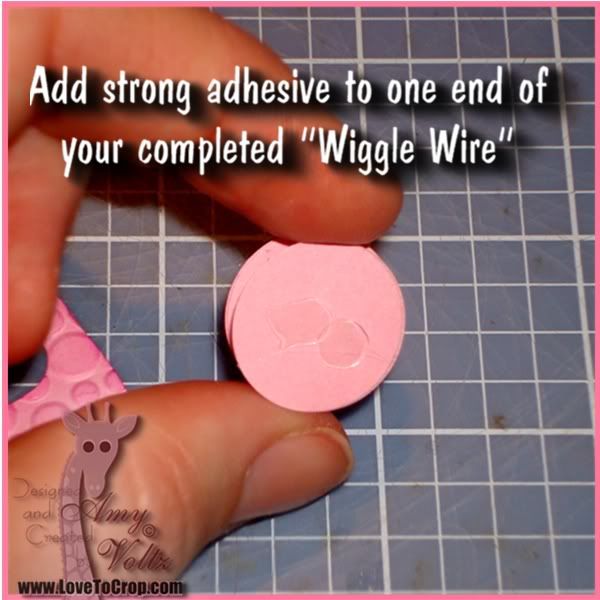
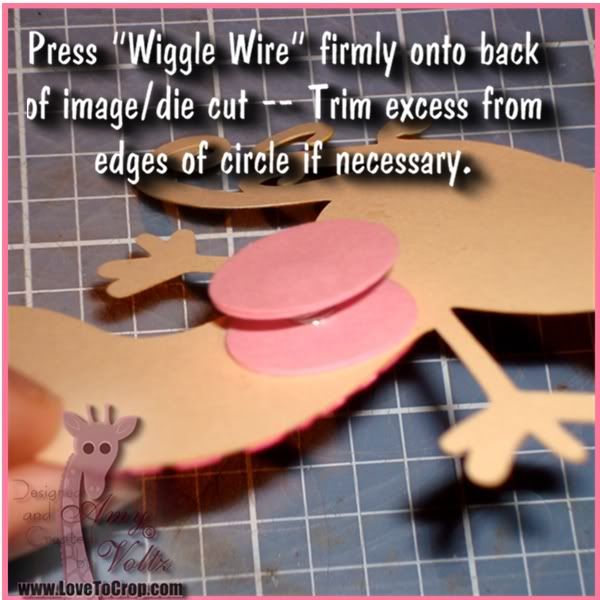
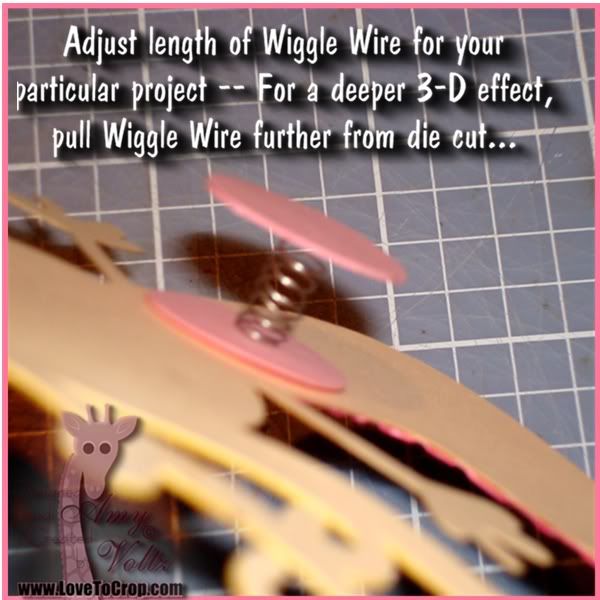
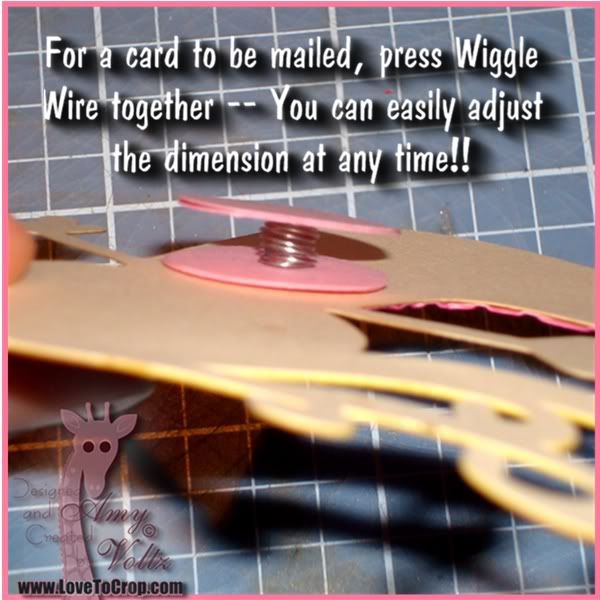
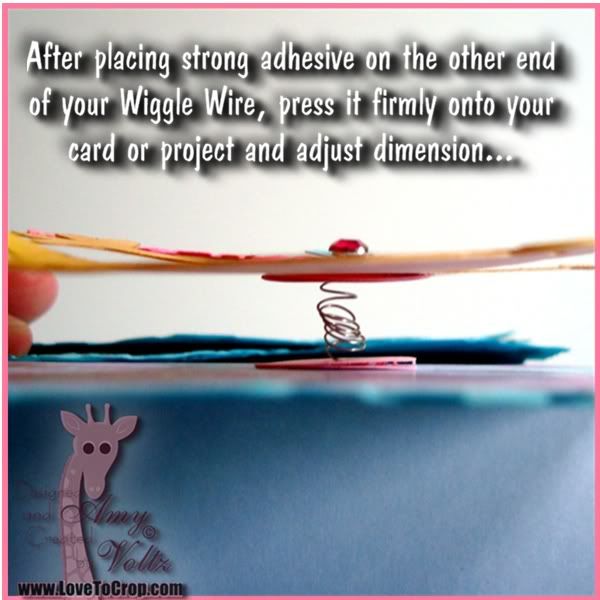
Amy also shared the following tips on finding wire with me
Would love for you to try this out and leave my friend Amy some Blog love for her great directions. Maybe you can try this out for the "Pun Challenge" this week . Don't forget your projects are due Saturday and we would love to see your "Puns."
Also if you would like to make a card for little Emily click below to get info about Emily and how to send her a card at Michelle's blog at Scrappin' For Kenzie!

What a fun tutorial! Thank you!
ReplyDeleteAdorable work!
Carolyn
http://cccscraproom.blogspot.com
What a fun way to add some movement to any paper project! Thank you both for sharing!!
ReplyDeleteWonderful tutorial, I have made these before but your pictures are fantastic and really helpful. I bought 50 of the real ones and the second one I took from the pack broke before I got it on my card. There was .30 down the drain. Not to happy about that one.
ReplyDeleteThanks again!
Thanks for letting me know about Amy's tutorial! I am going to pop over to her blog now, and then dig around my craft room to see if I have any floral wire - can't wait to try this out!
ReplyDeleteSo awesome!! I am going to have to try that... good thing my little one is having a birthday!
ReplyDeleteOhhh I saw this the other day and pinned it on Pinterest. ;)
ReplyDeleteI thought Amy's tutorial was fabulous too Suzanne! She made it look so easy and I can't wait to get some wire just to make some of these little beauties!! They will be so cute on cards for kids or adults-everyone loves a card that interacts with you! lol Thanks Amy for such an awesome step by step tutorial!! Your the best!!! Thanks Suz for sharing this with everyone as well!
ReplyDeleteOmgosh! The tutorial and pics are outstanding!! Thanks Amy.
ReplyDeleteBe blessed, Beckie
ohhhh how cute!!! thanks for sharing!! got to try this!
ReplyDeletehugs
Brenda
Awesome tutorial! I've seen other cards with springs on them for movement and wondered, "Where'd they get that?" Well now I can try it too! Thanks for posting here on FCCB!
ReplyDeleteThanks so much for all of your kind words!! As I like to say -- The "wiggles give me giggles" so I'm VERY happy that more Bloggie-Land-Friends will be giggling over their wiggling creations!! :)
ReplyDeleteSo glad you enjoyed the tutorial, Suzanne!! I'll be linking up my card (complete with a wiggle wire) in your challenge this week!! :)
Hugs,
Amy :) at www.lovetocrop.com
thank you so much, ladies, for sharing this idea. i will use it over and over as i make all of my cards for my friends and family. i am so excited about it, but wish i had known how to do this when my grandchildren were smaller. still, i will find a way.
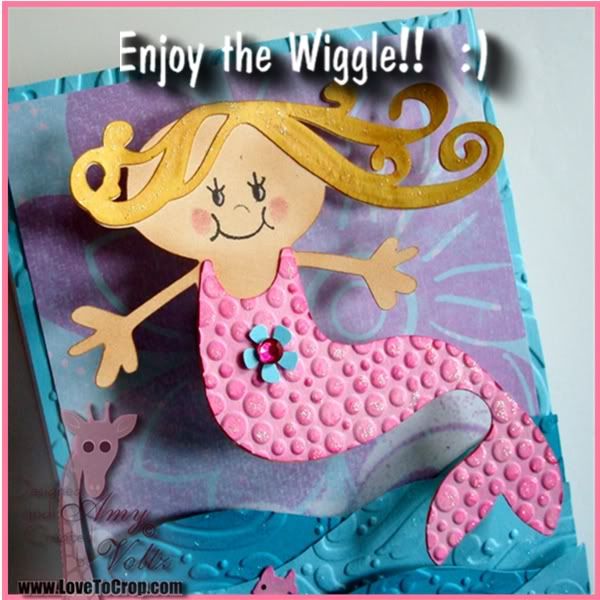
ReplyDeleteThe pink mermaid is so cute. Thanks for sharing the tutorial on how to wiggle wires. Will be surely using it this summer to make my crafts for kids.
ReplyDeleteThanks for the tutorial for making wiggle wires!
ReplyDeleteThanks for the tutorial for making wiggle wires!
ReplyDeleteLooks like fun love the tips for low cost
ReplyDeleteThank you for the tutorial. I just bought some wiggles....but with your idea, not any mre....haha
ReplyDeleteAmy,
ReplyDeleteThanks so much for this great tutorial! I was going crazy trying to figure out how to attach a bee to the inside of a box using wire. I was able to adapt this for my needs and it worked perfectly! Here's a link to what I made. I was sure to give you credit for this great idea: http://joyslife.com/3d-bee-box-surprise
Thank you,
~Joy~
Wonderful idea! Thank you for sharing :o)
ReplyDeleteThanks for sharing your instructions with us.Gotto go now and round up supplies. Thanks again
ReplyDeleteThanks for sharing. It is a great tutorial.
ReplyDeleteThank you for sharing!!! I am sooo excited to do this!!!
ReplyDeleteThanks for the tutorial.
ReplyDeleteGreat idea, thanks a lot!
ReplyDeleteGreat idea! Sure will use it to create a fun one!
ReplyDeleteOH HOW EXCITING-i WANT TO DO THIS WITH MY FROG STAMP ADDING WIGGLE EYES TO HIM.
ReplyDeleteI know this will make someones day
THANK YOU SO MUCH
Thank you both for this tutorial.
ReplyDeleteI have made these before but you're idea is more cleaver Than mine. Thanks for sharing.
ReplyDeleteI would think maybe you could use the wire from an ink pen that doesn't work anymore. I think I will try that to see if it works.
ReplyDelete