
Happy Thursday!
I love to use stamping on my die cuts, but find there are times when I just don't have the pefect sentiment. And I've used the "center point" function on my Cricut when trying to cut out pre-printed journaling, but I always manage to get it just slightly "off" center. :) So I print journaling from my word processing program directly onto my die cuts, after cutting them. I featured this tutorial on a previous Scrappin' Saturday a while back, and I still get inquiries on how to do it, so I thought I would share it here again for a Thursday's Tutorials!
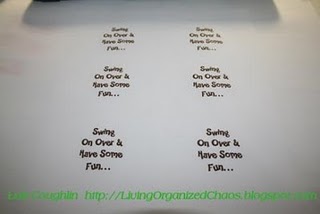
1. In your word processing program, type your text exactly how you want it on your die cut, making sure to leave enough space between them if you are printing multiple journaling spots:

2. Print out your text on a regular piece of printer paper. At this time, place your die cuts (which have already been cut to the size you want) over the text and adjust size/spacing if needed to make sure it fits nicely within the die cut. I typically print out several pages before I get it just right:
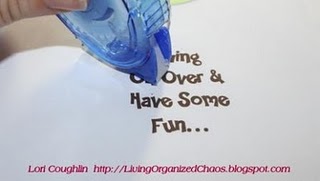
3. Add a very small amount of adhesive (tape runner) over the center of each journaling spot:
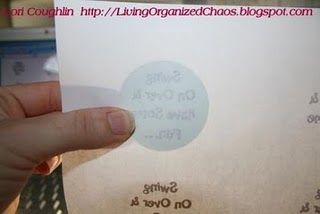
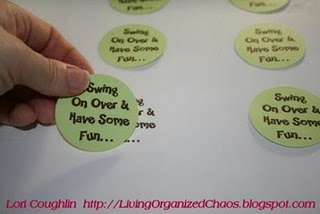
4. Turn your paper over and hold it up to a light or window. Take your die cuts and center them over the journaling spots (on the printed side). By using only a tiny amount of adhesive, you can easily remove the die cut and reposition it over the journaling:
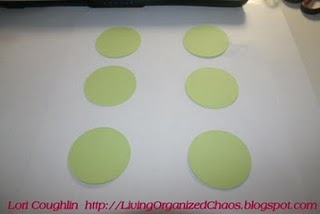
5. Once all of your die cuts are placed onto your paper, run the piece of paper (with die cuts attached) back through the printer, the same way you fed it into the printer before:
6. When finished printing, you'll have perfectly placed journaling on your die cuts:

7. Remove die cuts carfefully from the paper and attach to your project with additional adhesive:
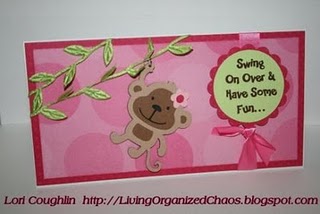
That's it! I've never had a problem with my die cuts coming off of the paper or jamming my printer, but I suppose all printers are different. I just have a super-cheapo HP Inkjet printer from Wal-Mart, nothing fancy, and it works every time!
Remember, you can use this on ANY shape you cut with your Cricut, provided it has space for text. Hope you'll let us know if you use this technique and give us a link to check it out!
Happy Crafting! :)


I love to use stamping on my die cuts, but find there are times when I just don't have the pefect sentiment. And I've used the "center point" function on my Cricut when trying to cut out pre-printed journaling, but I always manage to get it just slightly "off" center. :) So I print journaling from my word processing program directly onto my die cuts, after cutting them. I featured this tutorial on a previous Scrappin' Saturday a while back, and I still get inquiries on how to do it, so I thought I would share it here again for a Thursday's Tutorials!
1. In your word processing program, type your text exactly how you want it on your die cut, making sure to leave enough space between them if you are printing multiple journaling spots:
2. Print out your text on a regular piece of printer paper. At this time, place your die cuts (which have already been cut to the size you want) over the text and adjust size/spacing if needed to make sure it fits nicely within the die cut. I typically print out several pages before I get it just right:
3. Add a very small amount of adhesive (tape runner) over the center of each journaling spot:
4. Turn your paper over and hold it up to a light or window. Take your die cuts and center them over the journaling spots (on the printed side). By using only a tiny amount of adhesive, you can easily remove the die cut and reposition it over the journaling:
5. Once all of your die cuts are placed onto your paper, run the piece of paper (with die cuts attached) back through the printer, the same way you fed it into the printer before:
6. When finished printing, you'll have perfectly placed journaling on your die cuts:
7. Remove die cuts carfefully from the paper and attach to your project with additional adhesive:
That's it! I've never had a problem with my die cuts coming off of the paper or jamming my printer, but I suppose all printers are different. I just have a super-cheapo HP Inkjet printer from Wal-Mart, nothing fancy, and it works every time!
Remember, you can use this on ANY shape you cut with your Cricut, provided it has space for text. Hope you'll let us know if you use this technique and give us a link to check it out!
Happy Crafting! :)
OOOH! The light bulb has now come on! So THAT'S how to do that... who knew? Not me!! (-:
ReplyDeleteThank you for the great tip!!
Question: what is that FUN font you used for the sentiment in your tutorial pics?
Thanks. I'm going to try that.
ReplyDeletehttp://iwycd.blogspot.com/
Thanks for the info. I'll have to try this!
ReplyDeleteGreat idea! Thanks! My lesson for Thursday!
ReplyDeleteOf course....I am a follower! Hope you can do the same one day!
http://christysscrappin.blogspot.com/
Oh thanks so much for this tip....I don't know why I didn't think of this!
ReplyDeleteThis is a great tip, Lori! I have used this myself and it is much easier than using center point on the Cricut.
ReplyDeleteThanks ladies!
ReplyDeleteTo answer "Hestia's Helper", the font is called "Happy Sans" and is one of my most favorite fonts to use on kid-themed projects! I got it a dafont.com a while back. Thanks for your comments!
Lori :)
I tried this technique after you posted it awhile back! It's perfect! Thanks so much for sharing this with us!
ReplyDeleteNicole
This is great info. Thank you!
ReplyDeleteI love to do this too - as you can create whatever sentiment you'd like, in whatever size you like! Another tip is to actually use a Text Box as you can then go to Format to see/readjust the size of the box. This helps me get the sentiment to be the perfect size each time.
ReplyDeleteOh now I get it LOL! I had to read it twice, and mind brain finally processed it! I am really going to try this thank you so much!
ReplyDeleteI have done this in the past.....with so many ideas out there you can forget about so much. Thankyou for the reminder, its a great idea!
ReplyDeleteOh this is great! I use my center point a lot and I am like you and mis more often then not getting it right on the make. I have wasted a lot of ink, paper and time but no more! Thanks for sharing!
ReplyDeleteTara
http://creativeprincess-homemadehappiness.blogspot.com/
Thanks for sharing this tip! I have done it in the past, but kind of forgot about it! Now that I'm using the Cricut a TON more, it was a great reminder that I could do it! :)
ReplyDeleteWhat a great tip!! I am going to try that this weekend!!!
ReplyDeletewhat a great idea. i always have problems with the stamps coming out perfect and also adding your own sentiment is perfect>.
ReplyDeletethanks
mickey
Thanks for the great tip. I wouldn't have though that we could run our die cuts through the printer.
ReplyDeleteWonderful tip - tfs.
ReplyDeleteWhat a great idea!!
ReplyDeleteWhat a great tip! tfs
ReplyDelete